I2C 2 - Electric Boogaloo
Communication established. Now what?#
The last chapter details the pains of getting the silicon to respond to us. What needs to happen next is a two way communication with meaning. Since we’re working with a microcontroller, the first step is to establish a communication method that enables us to use the MCU as a bridge and talk to the target in such a way that we don’t have to hard-code every single thing. Up til now, I’ve set it to fire a command at the I2C bus on the push of a button and then report its’ findings over UART. The better way of doing this is to have the machine read the from UART, parse the data into a command and argument form, then react accordingly.
The interpreter#
What even is an interpreter? Traditionally this is the thing that reads and executes your code. Think of any of the really high level languages that abstract the machine away so far that you probably have several layers between you and even the C libraries that actually do the work. Languages that are not compiled - Python and JavaScript being probably the most prominent these days, but this also applies to bash for example. (Yeah sorry, Python is essentially just a HAL for C. I know it’s hard, but you had to find out one day.)
In this context, though? We’re talking about a method for the machine to understand what we’re saying. A piece of software to translate our input to the MCU. In simple terms, I want to write to the UART the MCU is listening on, something like i2c_write 28 89 00. The MCU needs to understand that it’s looking at a space delimited string that has different components to it. It needs to translate it into the command (i2c_write), device address (28), target register (89) and data (00). The arm-none-eabi gives us the tools for this inside string.h. We want strtok (breaking the string into tokens) and strtol (string to long int). Why int? For this right here, an int is okay, the end goal is registry manipulation and you can’t really store strings there. In the long term though? Yeah, we’re going to have to come up with something a lot more clever than this. The listening to UART part is, in the case of the RP2040, actually very easy. If you’re familiar with the CDC-ACM implementation on it, it essentially takes the emulation of the UART protocol over USB and treats it as stdio. Reading from and writing to it therefore becomes as easy as interacting with the bash shell on a UNIX system. If printf writes to stdout, anything incoming is going to be there in stdin. The mechanics of this are actually quite complicated and I’m not going into that now (partly because I dont’ actually understand it), but for us right now, this means we can simply parse a buffer char by char, then do some math on it and use the results in a follow-up.
The code snippet I used to verify this is as follows:
int main() {
    stdio_init_all();
    char buf[MAX_LEN];
    int idx = 0;

    while (true) {
        sleep_ms(100);
        int c = getchar_timeout_us(0);
        if (c != PICO_ERROR_TIMEOUT) {
            if (c == '\n' || c == '\r' || idx >= MAX_LEN - 1) {
                char *send_cmd= strtok(buf, " ");
                char *arg = strtok(NULL, " ");
                printf("read cmd: %s read arg %s\n", send_cmd arg);
                buf[idx] = '\0';
                idx = 0;
            } else {
                buf[idx++] = (char)c;
            }
        }
    }
}
The condition for the if statement looks for either \n or \r, which is different between Linux and UNIX. Since my laptop uses \r by default when pressing enter, I need to add that there or the machine would never realise I sent it a string with an endline terminator.
Let’s see if it works then, shall we?
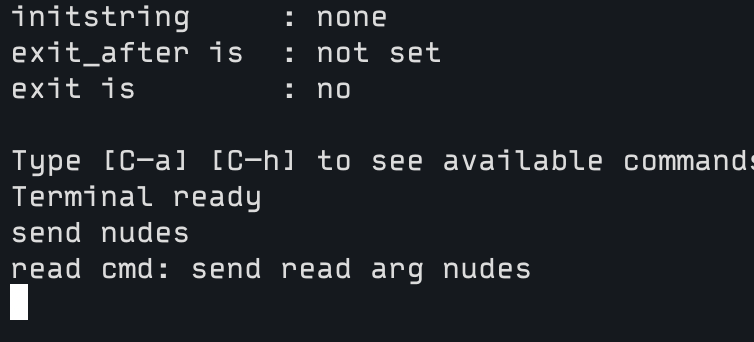
Looks like it’s doing what we want it to be doing. This is excellent.
That’s it for today though. This post is a placeholder for a few days. Until I clean up my head and write something meaningful. I wanted this up to update my friends on my doings as I know some have been asking me what’s up. So you get this while I prepare for a proper release. I have already kind of verified that the STUSB4500 itself listens and writes the registers, but I’ve yet to get the soft restart to work and I don’t want to write to the NVM as part of the debug process because 1. you only get a few shots at this as the registers have limited writes (this differs source by source, but it’s supposed to be a one time programmable thing, yet some sources claim it can be programmed “a few” times) and 2. neon.Volt needs to be able to do this on the fly anyway. The NVM is there really just so you could use this device standalone so the idea is to program it once via something like a flying probe or a bed of nails.